Connector Types
Power Automate currently offers 3 different connectors, to connect Power Automate with your Dynamics 365 instance:
Today we will look on ways how to retrieve option set labels via the different connectors, for our sample accounts:

Dynamics 365
This connector should not be used any more, since in April 2019 it has been announced as being deprecated.
With the Dynamics 365 connector it was quite easy to work with optionsets, since it offered both the optionset value (int) and the optionset label (name) in the dynamic content:

And here we go, these are our results:

Common Data Service
Since the Dynamics 365 connector has been deprecated, this is the connector you should use.
If you perform a "Get record" or "List records" action, the optionset value and the optionset label are both part of the JSON returned by the action. Though only the optionset value can be chosen from the dynamic content:
So lets have a look at the content of the returned JSON:

As you can see, the lable of the optionset is there, so how can we reference it in Power Automate?
The solution is to define an expression like items('_<name of apply action>')['<name of the field>_label'], e.g. items('ApplyEachAccount')['_customertypecode_label'] in our case:

And again these are our results:

Common Data Service (current environment)
The Common Data Service (current environment) connector is only offered, if you add your flow to a solution.It offers more actions than the "normal" Common Data Service connector, e.g. you can use the new AI features (predict), perform actions in CRM, get file or image content, a.s.o.:

And it offers a more advanced "List records" action, where you can e.g. limit the returned attributes via a select query, which should improve the performance of your flow:

It even allows to provide a Fetch XML statement as your search criteria, so you can define your search in advanced find in CRM and just have to download the Fetch XML statement:

BUT unfortunately the List records action does not return any optionset labels with this connector:

Which means, there is no easy workaround, like in the above sample for the "normal" Common Data Service connector to access the optionset labels via an expression.
So I would suggest, if possible, to use the "normal" Common Data Service connector, in case you have to work with optionsets.
BUT, if you really want to go the hard route you can:
Query stringmap table
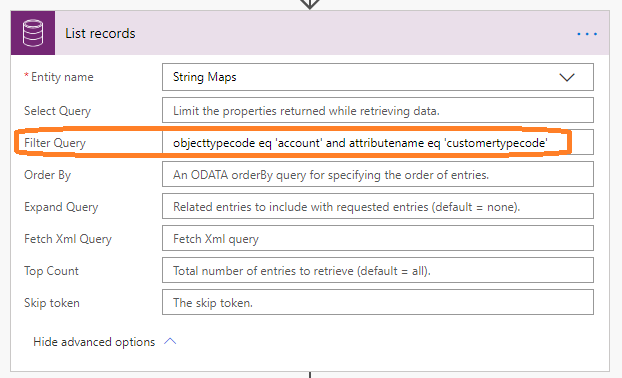
The stringmap table, is the table that contains the metadata behind your optionsets and it can also be queried via a List records action.
First we initialize a variable of type array to store the result of our "List records" action.

Then we query the stringmap table for all values of the relationship type optionset by providing the entity (=objecttypecode) and the field (= attributename) in the filter:
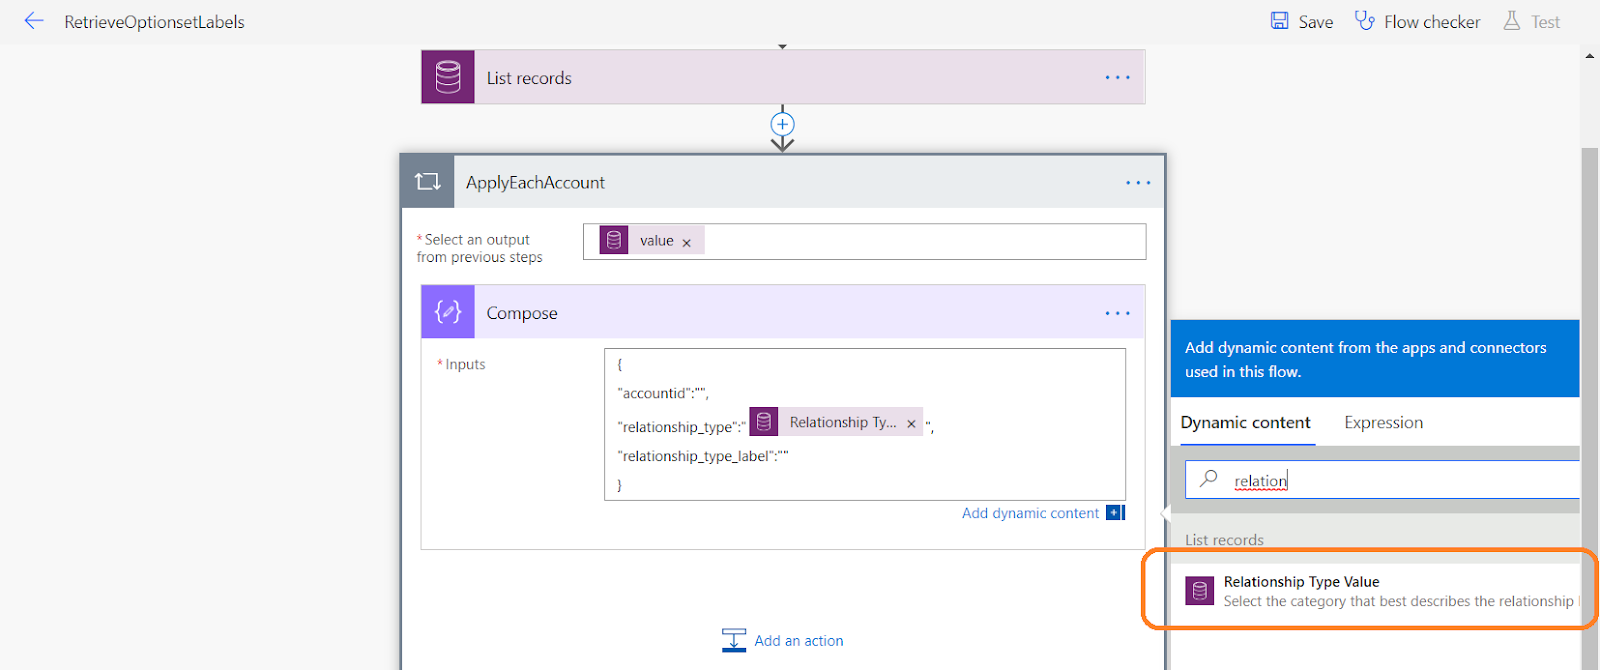
As a next step we loop over all results and append them to our array variable, to have a dictionary to lookup the optionset labels based on the values:

Then we perform a "List records" action to query all accounts, loop over all returned accounts and filter the array based on relationship type:

Finally we can access the optionset labels via the following formula:

And here we go:

This works great with simple or global option sets! Have you attempted these steps with a multi-select optionset? When I attempt to go through the steps it is not returning the labels after the filter array:
ReplyDeleteFilter Array Inputs:
[
{
"value": "Virginia",
"attributelabel": "895950000"
},
{
"value": "North Carolina",
"attributelabel": "895950001"
},
{
"value": "Maryland",
"attributelabel": "895950002"
},
{
"value": "Washington DC",
"attributelabel": "895950003"
}
]
Filter Array Output:
[]
Compose Step outputs:
{
"incidentid": "fad1e095-d3c9-e911-a972-000d3a4e72d5",
"regionvalue": "895950000,895950003",
"regionlabels": ""
}
Here is the Stringmap approach applied to a multiselect optionset: https://youtu.be/qojYnMu2Nlw
DeletePerfect! worked like a charm! Thank you!
DeleteWhy did Microsoft deprecated the D365 Connector? WTF?? Why removing the ability to easily retrieve options sets labels... I don't understand. This create a lot of issues.... (ARGH!!)
ReplyDeleteWith the latest update of Common Data Service (current environment) connector, we can now query the formatted values of supported field types such as lookup display name, option set value label, formatted date/time by using the OData.Community.Display.V1.FormattedValue property of the field in the expression.
ReplyDeletehttps://linnzawwin.blogspot.com/2020/07/get-lookup-display-name-and-option-set.html
Thank you for sharing wonderful information with us to get some idea about that content.
ReplyDeleteMulesoft Self Learning
Mulesoft Online Training in India
Mule 4 Online Training
Mulesoft Online Training india
Mulesoft Online Training in Hyderabad
Mulesoft Online Training Hyderabad
Mule ESB Training
Learn Mulesoft Online
Mulesoft Training Courses
Mulesoft Online Course
Online Mulesoft Training
Mulesoft Certification
Learn Mulesoft
Mulesoft Online Training
I wish to show thanks to you just for bailing me out of this particular trouble. As a result of checking through the net and meeting techniques that were not productive, Same as your blog I found another one Inbounce Marketing .Actually I was looking for the same information on internet for Inbounce Marketing and came across your blog. I am impressed by the information that you have on this blog. Thanks once more for all the details.
ReplyDeletekayseriescortu.com - alacam.org - xescortun.com
ReplyDeleteMicrosoft: let's take something super simple, and let's make it harder.
ReplyDeleteWorking with Optionset lables in Power Automate
ReplyDeleteVery informative post...! Keep sharing the great work...
Microsoft power automate services
Microsoft Power Automate Solutions
Yeni perde modelleri
ReplyDeleteSMS ONAY
Turkcell mobil ödeme bozdurma
Nft nasil alınır
ANKARA EVDEN EVE NAKLİYAT
TRAFİK SİGORTASİ
Dedektor
web sitesi kurma
aşk romanları
This comment has been removed by the author.
ReplyDeleteVery helpful blog.Microsoft Dynamics CRM is an integrated, data-driven software solution that improves how you interact and provide solutions to your client’s business requirements.
ReplyDelete